


Arkheでおしゃれなコンタクトフォームを作りたい
お問い合わせフォームとして代表的なのが、プラグインの「Contact form7」です。
今回は、WordpressテーマArlkheを使用している際のcssカスタマイズをご紹介させていただきます。
目次
【Arkhe】Contact form7カスタマイズ
まずは、「Wordpressの管理画面」→「プラグイン」にて、「Contact Form 7」をインストール⇒有効化まで完了させていただください。
そうすると、ダッシュボード内に「お問い合わせ」が追加されますので、フォーム内のHTML(下記画像部分)を編集していく形になります。
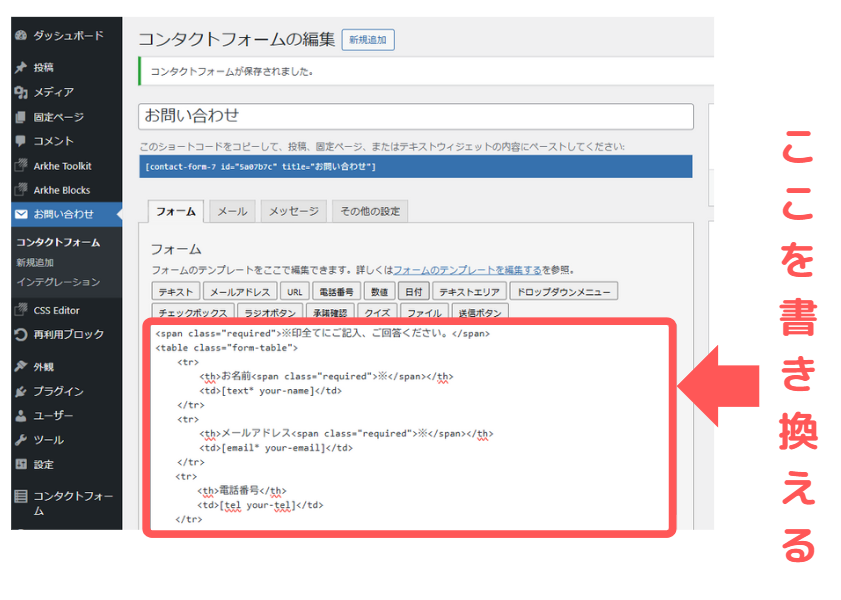
それではカスタマイズ方法をご紹介します。
カスタマイズ①テーブル形式で表示

HTML コードを表示
<table class="form-table">
    <tr>
        <th>お名前<span class="required-label">必須</span></th>
        <td>[text* your-name]</td>
    </tr>
    <tr>
        <th>メールアドレス<span class="required-label">必須</span></th>
        <td>[email* your-email]</td>
    </tr>
    <tr>
        <th>電話番号</th>
        <td>[tel your-tel]</td>
    </tr>
    <tr>
        <th>お問い合わせ内容の種類<span class="required-label">必須</span></th>
        <td>[checkbox* check use_label_element "ホームページについて" "SNS運用について" "その他"]</td>
    </tr>
    <tr>
        <th>ご質問・ご相談内容について<br>具体的にご記入ください。<span class="required-label">必須</span></th>
        <td>[textarea* contact]</td>
    </tr>
</table>

[submit "送信"]
CSS コードを表示
/* 送信ボタンのスタイル */
.wpcf7-submit {
    margin-top: 30px; /* ボタンの上の余白 */
    background-color: #4f6f22; /* ボタンの背景色 */
    color: #fff; /* ボタンの文字色 */
    padding: 15px; /* ボタンの内側の余白 */
    width: 40%; /* ボタンの幅 */
    display: block; /* ブロック要素として配置 */
    margin-left: auto; /* 左右中央寄せ */
    margin-right: auto;
}

/* 戻るボタンのスタイル */
.wpcf7-previous {
    border:1px solid #4f6f22;
    color: #4f6f22;
    padding: 15px;
    width: 40%;
    display: block;
    margin-left: auto;
    margin-right: auto;
}

/* 必須ラベル */
.required-label {
   display: inline-block;
   margin-left: 15px;
   padding: 1px 3px;
   border: 1px solid #a41318;
   color: #fff;
   background-color:#a41318;
   font-size: 9px;
   vertical-align: middle;
}

/* テキストフィールドとテキストエリアのスタイル */
.wpcf7-text, .wpcf7-textarea {
    width: 90% !important; /* フィールドの幅 */
}

/* チェックボックスのリストアイテム */
span.wpcf7-list-item {
    margin-top: 5px; /* アイテム間の余白 */
    display: block; /* アイテムをブロック表示 */
}

/* フォームのテーブルスタイル */
.form-table {
    border-collapse: collapse; /* テーブルの枠線を結合 */
}

/* 各セルのスタイル */
.form-table tr th,
.form-table tr td {
    padding: 20px !important; /* セル内の余白 */
    border-left: none; /* 左の境界線なし */
    border-right: none; /* 右の境界線なし */
}

/* テーブル全体の境界線 */
.form-table, .wp-block-flexible-table-block-table table {
    border-right: 0;
}

/* 最初の行に境界線を追加 */
.form-table tr:first-child th,
.form-table tr:first-child td {
    border-top: 1px solid #ccc;
}

/* 最後の行に境界線を追加 */
.form-table tr:last-child th,
.form-table tr:last-child td {
    border-bottom: 1px solid #ccc;
}

/* それ以外の行にダッシュ線 */
.form-table tr td {
    border-top: 1px dashed #ccc;
}

/* ヘッダーセルの背景色 */
.form-table tr th {
    background-color: #F8F7F3;
}

/* スマホ表示では縦に並べる */
@media screen and (max-width: 1000px){
    .form-table,
    .form-table tbody,
    .form-table tr,
    .form-table th,
    .form-table td {
        display: block;
        width: 100%;
    }

    .form-table tr td {
        border-top: none;
    }

    .form-table tr th {
        border-top: 1px solid #ccc;
        border-bottom: 1px solid #ccc;
    }
}
まとめ
今回は、ArkheでのContact form7のカスタマイズ例をご紹介させていただきました。
また追加することもあると思いますので、随時ご確認ください。
~本日も最後までお読みいただきありがとうございました!~

コメント